In this guide, I will show you how to install WordPress on a Raspberry Pi using Nginx as the webserver.
Before we begin, I am assuming you are familiar with setting up your Raspberry Pi and have had plenty of exposure to the command-line interface. If you need a refresher, feel free to check out my guide on how to do a Headless Setup with the Raspberry Pi.
What you’ll need:
- Raspberry Pi (I used a Zero W, but I recommend a model with more ram and CPU cores)
- microSD card
- microSD card adapter
- Raspberry Pi power supply
Step 1: Update Packages and Repositories
The best practice is to always update and upgrade all packages on our Raspberry Pi when starting a new project. Use the following commands:
sudo apt update
sudo apt upgrade
Step 2: Install Nginx Web Server, MariaDB, and PHP
Next, we need to install Nginx, an all-in-one load balancer, content cache, and web server.
To do this use the following command:
sudo apt install nginxWe also need a database server that WordPress will use as a storage solution for all of your posts, pages, and other content.
We will be using MariaDB and you can install it with the following command:
sudo apt install mariadb-serverLastly, we need to install php-fpm and php-mysql. PHP-FPM (FastCGI Process Manager) is commonly paired with web servers to serve applications that require a PHP framework. PHP-FPM also uses considerably less memory and CPU in comparison to other instances of PHP, making it a perfect match for Nginx.
Install both using the following command:
sudo apt install php-fpm php-mysqlStep 3: Installing WordPress
We now have all of the packages needed to run WordPress!
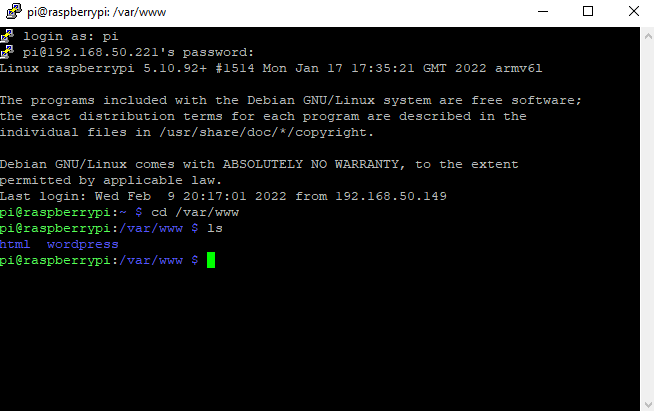
We are going to install WordPress in the /var/www/ directory. Here you will see the default html directory; however, we will be hosting our website out of the wordpress directory. This directory will appear after downloading and extracting the latest WordPress installation files.
Download the WordPress installation files and extract the latest.tar.gz archive file using the following commands:
cd /var/www
sudo wget https://wordpress.org/latest.tar.gz
sudo tar -xzvf latest.tar.gz
sudo chown -R www-data:www-data wordpress # Avoids permission issues when we install WordPress later
Once it is extracted, type ls to list all contents within /var/www/, and confirm that the new wordpress directory is present. We no longer need the latest.tar.gz archive file and we can remove it with sudo rm latest.tar.gz.
In order to make changes to the wordpress directory, we need to give ownership of the directory to the pi user. To do this, use the following command:
sudo chown -R pi:pi wordpress/ # Changes file ownership to pi and all content underneath the wordpress/ directoryWe now need to communicate to the Nginx web server that we have changed the location of our WordPress website and to use the new wordpress directory.
Navigate to the /etc/nginx/sites-available/ directory and remove the default configuration file by using sudo rm default. We will replace this file with our own using sudo nano wordpress.conf.
Insert the following code into wordpress.conf
upstream wp-php-handler {
        server unix:/var/run/php/php7.3-fpm.sock; # If it does not match change from 7.3 to 7.4
}
server {
        listen 80; # HTTP
        server_name _; # Accepts any domain name
        root /var/www/wordpress/; # Directory we just created
        index index.php; # Location block for PHP files
        location / {
                try_files $uri $uri/ /index.php?$args;
        }
        location ~ \.php$ {
                include snippets/fastcgi-php.conf;
                fastcgi_pass wp-php-handler;
        }
}Note: Double-check that the version of PHP-fpm you are running matches the version in wordpress.conf. You can do this by running ls /run/php to find out the version of PHP-fpm that was installed on your Raspberry Pi. If the versions do not match, simply change the version number in wordpress.conf.
To get Nginx to reference the new wordpress.conf configuration file, we need to create a symbolic link from the /sites-available/ directory to the /sites-enabled/ directory.
sudo ln -s /etc/nginx/sites-available/wordpress.conf /etc/nginx/sites-enabled/
sudo rm ../sites-enabled/default # Remove the default configuration file for safe measure
sudo systemctl restart nginx # Restarts Nginx service
Creating a Database Configuration
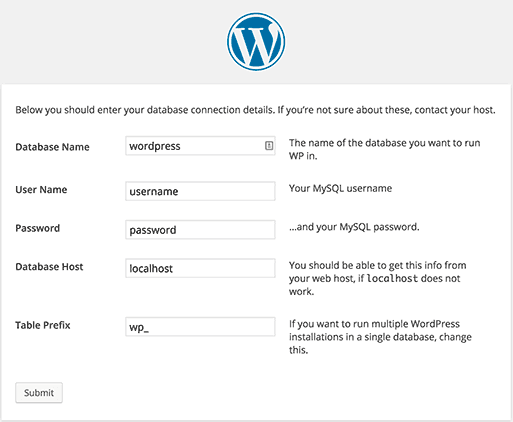
Before we jump into WordPress, we need to configure our login information for the user.
create database wordpress default character set utf8 collate utf8_unicode_ci;
create user 'username'@'localhost' identified by 'password'; # Replace username and password with your own
grant all privileges on wordpress.* TO 'username'@'localhost'; # Remember to change "username"
flush privileges;
exit
Step 4: Configuring WordPress
Type in your Raspberry Pi’s IP address into your browser and it should navigate you to set up WordPress.
Note: If you get a 502 Bad Gateway error, you may have an issue with the PHP-FPM version that is in wordpress.conf. Refer to the instructions in Step 3: Installing WordPress.
Proceed with the WordPress installation process and make some key changes to your website such as:
- Site Title
- Username
- Password
- Toggle “Discourage search engines from indexing this site”
Next Steps
You now are running WordPress from your Raspberry Pi! Keep in mind that this is just a local site available to your internal network. It is not open to the internet unless you configure port forwarding on your router. Do this with extreme caution!
If you decide to buy a hosting platform for your website, download All-in-One WP Migration and export your local site to a WPRESS file. This allows you to do the import your site and all its contents to a hosting platform of your choosing.
This guide was inspired by Tony Teaches Tech on YouTube.