In this guide, I will be showing you how to forego the extra peripherals and directly configure your Raspberry Pi over WiFi.
Disclaimer: I highly recommend that you set up WiFi and SSH before booting your Raspberry Pi for the first time. The reason is that the Raspberry Pi does an initial check to see if both files exist during the bootup process. If you have already booted the Raspberry Pi without the files present, you will have to flash a fresh Raspbian image to the microSD card and start over.
What you’ll need:
- Raspberry Pi
- microSD card
- microSD card adapter (if your PC does not have a built-in reader)
- Raspberry Pi power supply (of course)
Step 1 – Creating a fresh SD card with the latest Raspbian image
Navigate to the Raspberry Pi website to get the latest Raspbian image and download a program that enables you to create bootable media ( i.e, BalenaEtcher or Rufus).

Extract and load the Raspbian image you just downloaded into balenaEtcher (or Rufus), select your microSD card, and flash! This only takes a couple of minutes and you should be ready to go.
Step 2 – Creating wpa_supplicant.conf
Create a blank text file using a plain text editor (I use Notepad ++). If you are on a Windows machine, make sure to convert the file to use Linux-style line breaks by doing EOL conversion to Unix.
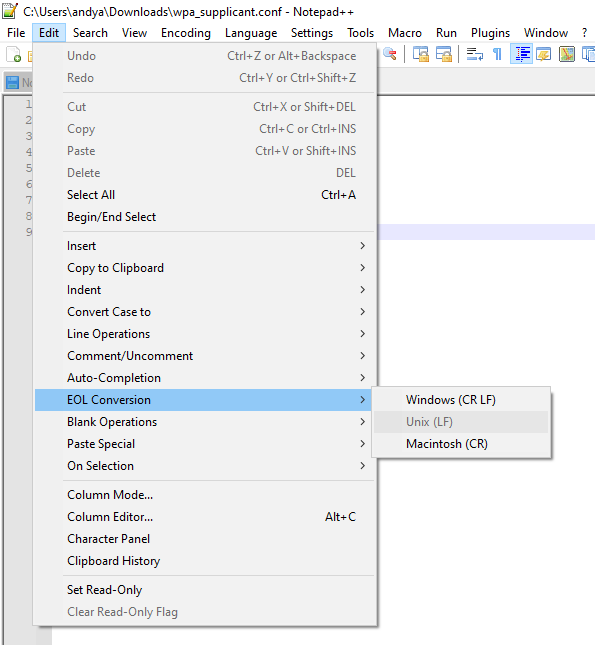
Once converted to Unix, insert the following text into the text file:
country=us
update_config=1
ctrl_interface=/var/run/wpa_supplicant

network={
 scan_ssid=1
 ssid="YourWifiSSID"
 psk="YourPassw0rd"
}
Note: Make sure the country code is set to the ISO/IEC alpha2 code for the country you reside in. Common codes include:
- us (United States
- fr (France)
- de (Germany)
Setting up WiFi and SSH beforehand is especially useful for the Raspberry Pi Zero W where a USB hub is required to connect a monitor, mouse, and keyboard.
Step 3 – Copy wpa_supplicant.conf and create an ssh file
Copy the wpa_supplicant.conf file you just created and paste it into the boot partition on your microSD card. On a Windows machine, it is the only partition you will see and will contain files like:
- config.txt
- cmdline.txt
- start.elf
- bootcode.bin
We will also utilize this time to also create the SSH file that will allow us to securely access our Raspberry Pi over port 22. In the boot partition of your microSD card, create a text file, rename it to ssh, and delete the .txt extension before you hit enter. You will receive a warning on Windows that says ” If you change the file extension, it may become unstable”, simply ignore this message and proceed. When you power on the Raspberry Pi, the device will search for the SSH file, confirm that it is present, and enable SSH automatically!
Step 4: Eject the SD card, insert it into your Raspberry Pi, and boot!
That’s it! You are done, but let me give you some extra tips that will help you to remotely connect to your Raspberry Pi for the first time.
Next Steps:
- Download puTTY, a terminal emulator that is light-weight and free SSH client.
- Download and run Angry IP Scanner to find your Raspberry Pi’s IP address.
- Here is a cheat sheet of Raspberry Pi commands that will help you in the long run 🙂
- Get into the healthy habit of running
sudo apt-get updateandsudo apt-get upgradewhenever you first SSH into a Raspberry Pi.